Have you ever wondered what SASS stands for? Or perhaps you already know what it is but haven’t taken the time to study and use it.
Whether you’re learning about it for the first time, or want to brush up on your knowledge of the subject, this is the article for you.
In this post, you’ll learn the fundamentals of Sass, what it is, and how to use Sass’s awesome features to speed up the process of writing styles.
Prerequisites
This article assumes that you have:
- Basic understanding of HTML & CSS
- A code editor (VS Code recommended). If you don’t have it installed, download it here.
- And a browser (Chrome or Firefox recommended)
What exactly is Sass?
Sass (Syntactically Awesome Style Sheets) is a CSS preprocessor that gives your CSS superpowers.
Let’s face it: writing CSS can be difficult at times, especially in today’s world of increasingly complex user interfaces.
And many times, you’ll find that you’re repeating yourself often.
Sass comes to the rescue in this situation. It helps you stick to the DRY (Do Not Repeat Yourself) philosophy when writing CSS.
Sass provides a compiler that allows us to write stylesheets in two different syntaxes, indented and SCSS. Let’s look at each now.
Indented syntax
This is the older syntax that is indented, and gets rid of the curly braces and semi-colons. It has a file extension of .sass.
nav
  ul
    margin: 0
    padding: 0
    list-style: none

  li
    display: inline-block

  a
    display: block
    text-decoration: none
SCSS syntax
This is the newer and more popular syntax. It is essentially a subset of the CSS3 syntax. This means that you can write regular CSS with some additional functionalities.
Due to its advanced features it is often termed as Sassy CSS. It has a file extension of .scss.
nav {
  ul {
    margin: 0;
    padding: 0;
    list-style: none;
  }
  li {
    display: inline-block;
  }

  a {
    display: block;
    text-decoration: none;
  }
}
Quick Disclaimer: This article uses the SCSS syntax because it’s more widely used.
How Does Sass Work?
Sass works in such a way that when you write your styles in a .scss file, it gets compiled into a regular CSS file. The CSS code is then loaded into the browser.
That is why it’s called a Preprocessor.
Why should you use Sass?
- Easy to learn: If you are familiar with CSS already, then you’ll be glad to know that Sass actually has a similar syntax, and so you can start using it, even after this tutorial 😉
- Compatibility: It is compatible with all versions of CSS. So, you can use any available CSS libraries.
- Saves time: It helps reduce the repetition of CSS, because of its powerful features.
- Reusable code: Sass allows for variables and chunks of code (mixins) that can be reused over and over again. This helps you save time and makes you able to code faster.
- Organized Code: Sass helps keep your code organized by using partials.
- Cross Browser Compatibility: Sass gets compiled into CSS and adds all the necessary vendor prefixes so you don’t have to worry about manually writing them out.
Features of Sass
Here are some of the features that make Sass truly CSS with Superpowers:
Variables in Sass
You can declare variables in Sass. This is one of Sass’s strengths since we can define variables for various properties and use them in any file.
The benefit here is that if that value changes, you simply need to update a single line of code.
This is done by naming a variable with a dollar symbol $ and then referencing it elsewhere in your code.
$primary-color: #24a0ed;

.text {
  color: $primary-color;
}
button {
  color: $primary-color;
  border: 2px solid $primary-color;
}
Nesting in Sass
Most of the time, while writing CSS, classes are often duplicated. We can avoid this duplication by nesting styles inside the parent element.
In CSS,
nav {
  height: 10vh;
  width: 100%;
  display: flex;
}

nav ul {
  list-style: none;
  display: flex;
}

nav li {
  margin-right: 2.5rem;
}

nav li a {
  text-decoration: none;
  color: #707070;
}

nav li a:hover {
  color: #069c54;
}
With Sass, the above code can be written like this:
nav {
  height: 10vh;
  width: 100%;
  display: flex;

  ul {
    list-style: none;
    display: flex;
  }

  li {
    margin-right: 2.5rem;

    a {
      text-decoration: none;
      color: #707070;

      &:hover {
        color: #069c54;
      }
    }
  }
}
Parent Selector
In the Sass code above, you might notice the ampersand symbol & used with the hover pseudo-class. This is called a Parent Selector.
The parent selector,
&, is a special selector invented by Sass that’s used in nested selectors to refer to the outer selector. Source – Sass Documentation
So, in the case of the code above, & will refer to the parent which is the anchor tag a.
You can check out my article on how to implement Sass using BEM methodology.
Partials in Sass
This is one of the many awesome features of Sass that gives you an advantage.
As stylesheets grow large over time, it gets difficult to maintain them. Because of this, it just makes sense to break your stylesheets into smaller chunks. In other words, Partials help you organize and structure your code.
To declare a partial, we will start the file name with an underscore _, and add it in another Sass file using the @import directive.
For example, if we have a _globals.scss, _variables.scss, and _buttons.scss, we could import them into the main SCSS file main.scss.
@import "globals";
@import "variables";
@import "buttons";
You’ll notice that the underscore and the .scss are not added. That is because Sass automatically assumes that you are referring to the .sass or .scss file.
Mixins in Sass
Another major issue with CSS is that you’ll often use a similar group of styles. Mixins allow you to encapsulate a group of styles, and apply those styles anywhere in your code using the @include keyword.
An example of when you’d use mixins is when using Flexbox.
@mixin flex-container {
  display: flex;
  justify-content: space-around;
  align-items: center;
  flex-direction: column;
  background: #ccc;
}

.card {
  @include flex-container;
}

.aside {
  @include flex-container;
}
Sass Functions and Operators
Sass provides a suite of tools to help write more programmatic code.
Sass offers built-in functions that enable us to do calculations and operations that return a specific value.
They range from color calculations to math operations like getting random numbers and calculation of sizes, and even conditionals.
It also provides support for mathematical operators like +, -, \, *, /, and %, which we can use with the calc function.
Here is an example using a pixel to rem conversion function:
@function pxToRem($pxValue) {
  $remValue: ($pxValue / 16) + rem;
  @return $remValue;
}

div {
  width: pxToRem(480);
}
However, it’s important to note that the
/operator for division is deprecated, and will be removed in Dart Sass 2.0.0. You can read about it in the Docs.
So, this is how it should be written:
@use "sass:math";

@function pxToRem($pxValue) {
  @return math.div($pxValue, 16px) * 1rem;
}

div {
  width: pxToRem(480px); // gives 30rem
}
Here is an example of conditional logic in a mixin:
@mixin body-theme($theme) {
  @if $theme == "light" {
    background-color: $light-bg;
  } @else {
    background-color: $dark-bg;
  }
}
Sass also provides the lighten and darken functions to adjust a color by a certain percentage.
For example:
$red: #ff0000;

a:visited {
  color: darken($red, 25%);
}
How to Set Up Sass for Local Development
Great! Now that we have learned about the “theoretical” aspects of Sass, let’s get into the code to better understand how it works.
In this section, you will learn how to set up a local development environment, and also go through a simple landing page I have prepared.
Check out the demo on Codesandbox and code repository on GitHub.
Ways to compile Sass
There are different ways of compiling Sass files which are:
- VS Code Extension
- Install using NPM globally
- Install using open source apps such as Compass.app, Live Reload, and Koala.
- Install using Homebrew (for MacOS)
In this tutorial, we will be using the VS code Extension option because it is the easiest to get started with.
How to Set Up Sass for VS Code
Step 1: Install Live Sass Compiler
First, launch Visual Studio Code. Once it’s loaded, go to the side panel on the left and select the extensions tab.
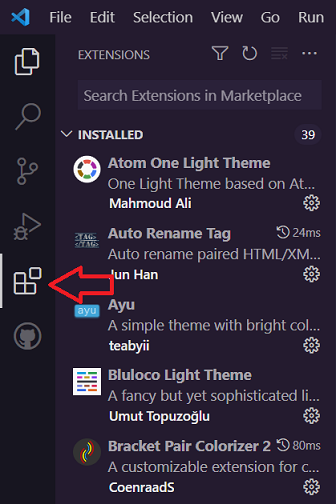
In the search bar, search for “Live Sass Compiler” and install it. This extension helps us to compile the Sass files — .scss (or .sass) – into .css files.
Step 2: Set the Save Location
Now change the file path so that Sass gets compiled into the styles folder.
To do this, you will make changes to the settings.json file.
In VS Code, go to File > Preferences > Settings. Now search for live sass compile to change the global settings.
Click on Edit settings.json.
Now, on the first few lines, where you see this code:
{
  "liveSassCompile.settings.formats": [
    {
      "format": "expanded",
      "extensionName": ".css",
      "savePath": "/"
    }
  ],
Change "savePath": "/" to "savePath": "/styles", so it now looks like this:
{
  "liveSassCompile.settings.formats":[
    {
      "format": "expanded",
      "extensionName":".css",
      "savePath":"/styles",
    },

    // You can also use this minified extension for production, as it reduces the file size

    {
      "format": "compressed",
      "extensionName":".min.css",
      "savePath":"/styles",
    }
  ],
Step 3: Compile Sass
Now, after saving the settings, go back to the Sass file, and click on the button that says “Watch Sass” at the very bottom of the window.

After you click the button, two files get created: .css and a .css.map in the styles folder.
You should not, however, change any of them. Because it already helps you compile the Sass into CSS every time you save new stylings.
Step 4: Link the CSS file
Then, link the CSS file in your index.html. In our case:
<link rel="stylesheet" href="/styles/main.css" />
Now run the file in your browser. This should be the resulting layout in CodeSandbox below:https://codesandbox.io/embed/currying-river-44d7zr?autoresize=1&fontsize=14&hidenavigation=1&moduleview=1&theme=dark&view=preview
Walking through the code
Here’s an explanation of the code from the previous section:
- We have a basic markup in the
index.htmlfile which contains a header and home/hero section.- It contains a link to the CSS file which the extension compiled for us.
- And some JavaScript for the responsive menu toggle.
- The
main.scssgets compiled, and the resulting CSS filemain.cssis what is imported in theindex.html:<link rel="stylesheet" href="/styles/main.css" /> - The Main Scss file
main.scssimports all of the partials:_base.scss,_components.scss,_home.scss,_layout.scss_responsive.scss,_variables.scss.@import "variables"; @import "base"; @import "layout"; @import "components"; @import "home"; @import "responsive"; - The base partial contains the mixins of
flexandgridwhich are included in the places where we need them.